.jpg)
About two years ago, I’ve launched my personal website and blog. Of course, as a self-taught web developer, I had to write my own “blog engine” from scratch, right 😉? So I went ahead and built my blog with Django, including a custom comment system and analytics. To be fair, it has served me well and I’ve definitely learned a lot along the way by doing that. However, there we’re a couple of things that I didn’t like about the setup. That’s why I’ve decided to re-built my blog as a static site using Coltrane, a static site generator built on top of Django. In this post, I want to share with you my learning journey and present the new setup.
How it started 🪴
When I set out to build my own website and blog, I had just learned using the Django web framework. So I started to build a very basic Django app with a single model for blog posts. One of the fields contained the content of the post in Markdown, which was then converted into html at request time. I added support for comments, which I wrote about in this blog post. For styling I used Tailwind CSS, which I’m still a big fan of today. To protect the site from spam, I integrated Google Recaptcha, which worked fine - at least for a while. I also added a custom analytics feature following the approach outlined in the article Custom Analytics with Django. I bought a domain and hosted the app on Pythonanywhere for 6 EUR/month. This was my very first live web app, and I was very proud about it. I started blogging, and seeing that people from all over the world were reading my content really felt awesome.
Pain points 😤
Over time however, I started to realise a couple of downsides of my setup:
Blogging workflow: The original decision of storing blogposts in Markdown in a database and then converting it into html at request time obviously isn’t very efficient. A bigger downside, however, was the workflow of creating content. I used a separate Git repository to work on and keep the history of my blogposts. Keeping both the database and the repository in sync when writing/updating blog posts required a lot of copy-pasting and was simply annoying.
Comments: There were a couple of problems with the custom comment system I had built: The first one was that there was no way to notify users when I replied to their comments. The second one was spam. Google Recaptcha was working fine in the beginning and I didn't get a lot of spam comments. However, in March 2022 this changed drasticly. I started looking for better ways of spam protection. E.g. Askimet looked like a sensible approach. I integrated django-blacklist as a quick-fix, which helped to reduce spam significantly by blocking specific IP address ranges. It was still far from being the ideal solution, and it didn't address the issue with not having users notified about replies.
Analytics: After running my site for about a year, my custom analytics dashboard was starting to take longer and longer to load. I managed to improve the query performance, however I realised that building my own analytics engine wasn’t very scalable and I wanted to explore alternatives. Still, understanding how web analytics work (and what Google, Facebook etc. know about us…) was a very valuable learning exercise.
Hosting: This site is a hobby project and it is not generating income (yet… ? 🤔). Pythonanywhere has been a great and simple way host my Django app, however the monthly costs still add up over time. In the end, it's just static content, so it should be possible to host it for free, no?
Solution 💡
I spend some time researching how I could address the different issues outlined above. Here are the different components of the solution I came up with.
Static site generator
I already had my blog posts in a Github repo in the form of Markdown files in order to keep the history. To improve the workflow, any changes should be published to the live website just by pushing to remote. On a Django Chat episode I learned about Coltrane, a
Simple content site framework that harnesses the power of Django without the hassle.
I decided to give it a try. I already used Django templates for my existing site, so the migration was a breeze. I also loved that instead of looking at some default markdown style when working on a new post, I was now able to see the post directly in the context of my site, which would refresh whenever I hit save. Awesome! ❤️
Hosting
With Coltrane taking care of generating all the static HTML for my blog from markdown, the next question is, how to host it? The Coltrane docs suggest using render.com. They have a free plan for static sites and it was very easy to set up a build command that re-deploys the site whenever a new commit is pushed to the Github repo. On the downside, render.com doesn’t seem to support server-side analytics.
After reading the blogpost How to Get Analytics from a Website Hosted on Amazon S3, I started looking into AWS and was surprised to learn that the free tier of CloudFront allows for plenty of traffic for free 🤑. The AWS docs explain how to set up CloudFront to serve static content from Amazon S3 (e.g. here and here).
In order make CloudFront behave the same way as my local dev server and redirect e.g. http://mysite.com/my-blog-post to the content file http://mysite.com/my-blog-post/index.html, I had to configure a small CloudFront function as described here.
function handler(event) {
    var request = event.request;
    var uri = request.uri;

    // Check whether the URI is missing a file name.
    if (uri.endsWith('/')) {
        request.uri += 'index.html';
    }
    // Check whether the URI is missing a file extension.
    else if (!uri.includes('.')) {
        request.uri += '/index.html';
    }

    return request;
}
Lastly, I configured Github actions to upload the static files to S3 on commit. Based on the basic example provided in this article, I added steps to fully automate the entire build and deployment process, including installing dependencies with poetry, building the static HTML files (coltrane record), uploading them to S3 and creating a CloudFront cache invalidation.
# .github/workflows/upload-website.yml
name: Upload Website

on:
  push:
    branches:
      - main
  workflow_dispatch:

env:
  COLTRANE_SITE_URL: https://www.samuelliedtke.com

jobs:
  deploy:
    runs-on: ubuntu-latest
    timeout-minutes: 10
    steps:
      - name: Checkout
        uses: actions/checkout@v3
      - name: Install Poetry
        run: |
          pipx install poetry==1.3.1
      - name: Set up Python
        uses: actions/setup-python@v4
        with:
          python-version: "3.10.8"
          cache: poetry
      - name: Set Poetry environment
        run: |
          poetry env use 3.10.8
      - name: Install dependencies
        run: |
          poetry install --no-root

      - name: Coltrane record
        run: |
          poetry run coltrane record --threads 1

      - name: Configure AWS Credentials
        uses: aws-actions/configure-aws-credentials@v1
        with:
          aws-access-key-id: ${{ secrets.AWS_ACCESS_KEY_ID }}
          aws-secret-access-key: ${{ secrets.AWS_SECRET_ACCESS_KEY }}
          aws-region: eu-west-2

      - name: Deploy static site to S3 bucket
        run: aws s3 sync ./output/ s3://samuels-blog --delete

      - name: Create Cloudfront cache invalidation
        run: |
          aws cloudfront create-invalidation --distribution-id ${{ secrets.CF_DISTRIBUTION_ID }} --paths "/*"
Analytics
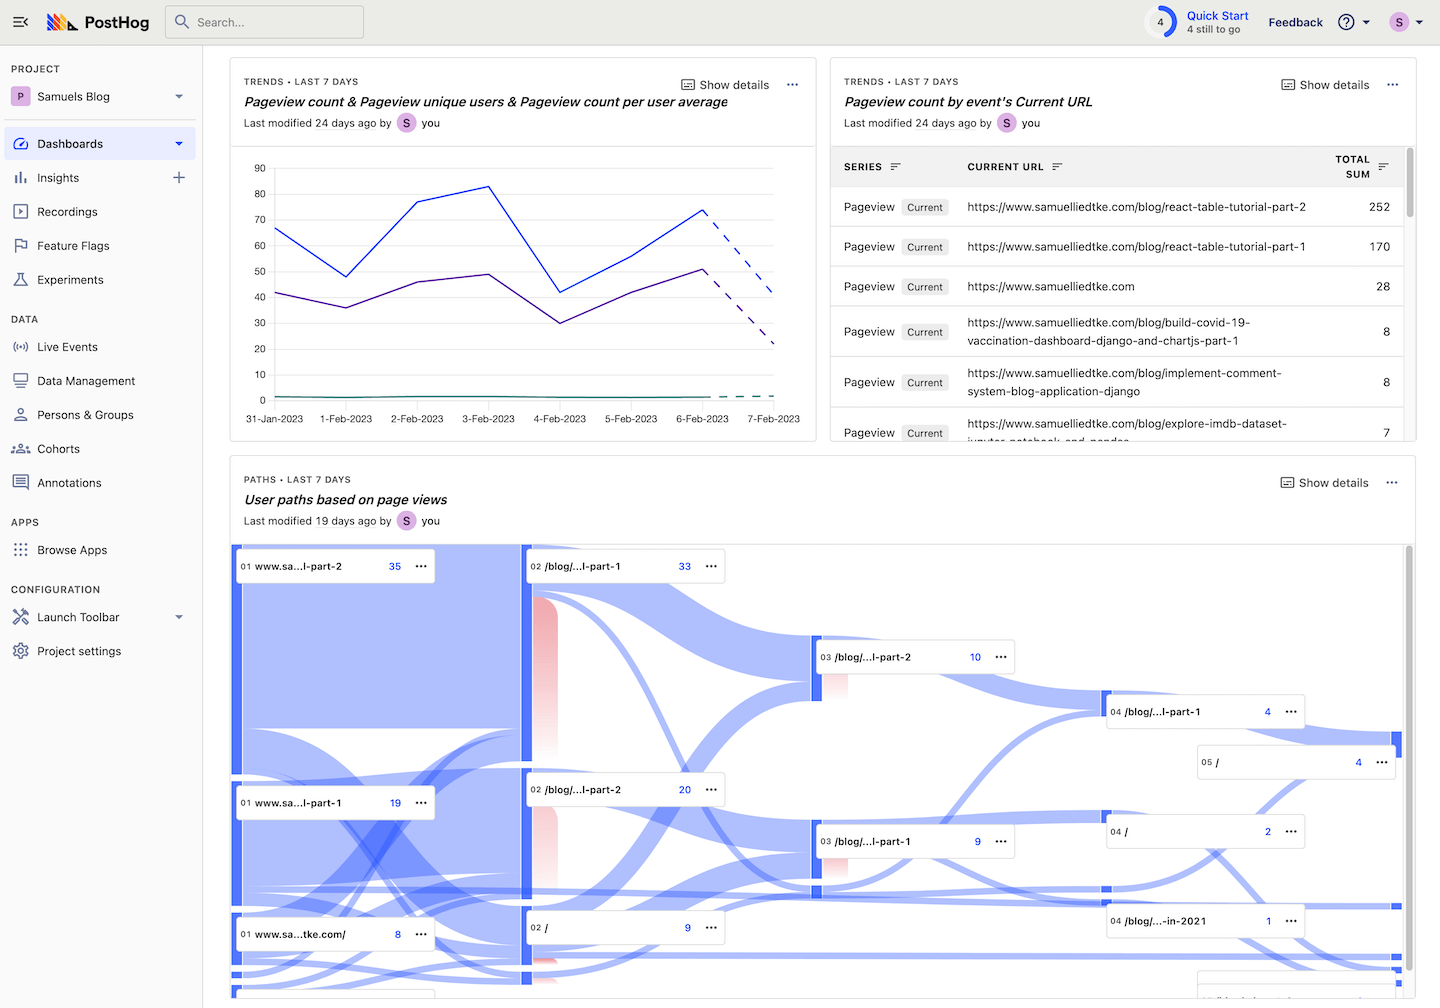
CloudFront has some simple functionality for analytics already built-in, and it also allows to save logs to S3 for further analysis. On top of that, I wanted to try out PostHog, a client-side product analytics service. It has a free tier, was very easy to integrate and provides some great insight, including page view counts and unique users over time, user paths and many more (I love looking at charts 📊...).
Comment functionality
To allow users to leave comments, ask questions etc. I’m now using Disqus. It provides easy comment moderation, has a built-in spam filter and users get notified when someone replies to their comment. They also offer a free tier.
Summary
I’m really happy with the new setup of my site. Easy blogging workflow, better comms with readers, no more spam and no more monthly costs. And all of that without developing and maintaining loads of custom code. 🎉
On to another two years of happy blogging!